
AI lifecycle stages
Saidot follows every AI system through seven lifecycle stages. Tasks turn each stage into owned work, sized to the system's risk level. Stage-specific gates decide what must be done before a system can enter a stage, and who decides the move. Admins and Space managers configure both in their Space(s). System teams then see what they need to do, complete their tasks and move the system forward.
Lifecycle stages
|
Lifecycle stage |
What happens |
Typical tasks |
|---|---|---|
|
Context, components and risk level are set |
Add system context, describe intended purpose, assign team roles, link components, classify risk and business impact |
|
Inherited risks are validated and controls assigned |
Validate inherited risks and add contextual ones, define treatments, validate policies, collect evidence for controls |
|
Evidence is reviewed and findings resolved |
Generate the transparency report, create and conduct reviews, create remediation tasks |
|
Monitoring goes live with the system |
Set up observability triggers |
|
Events and incidents keep the record current |
Observability-triggered reviews, assess escalated risk, investigate incidents |
|
A change reopens only what it affects |
Create and conduct a review, remediation tasks |
|
The system is closed and its record archived |
Complete the retirement checklist, archive the system |
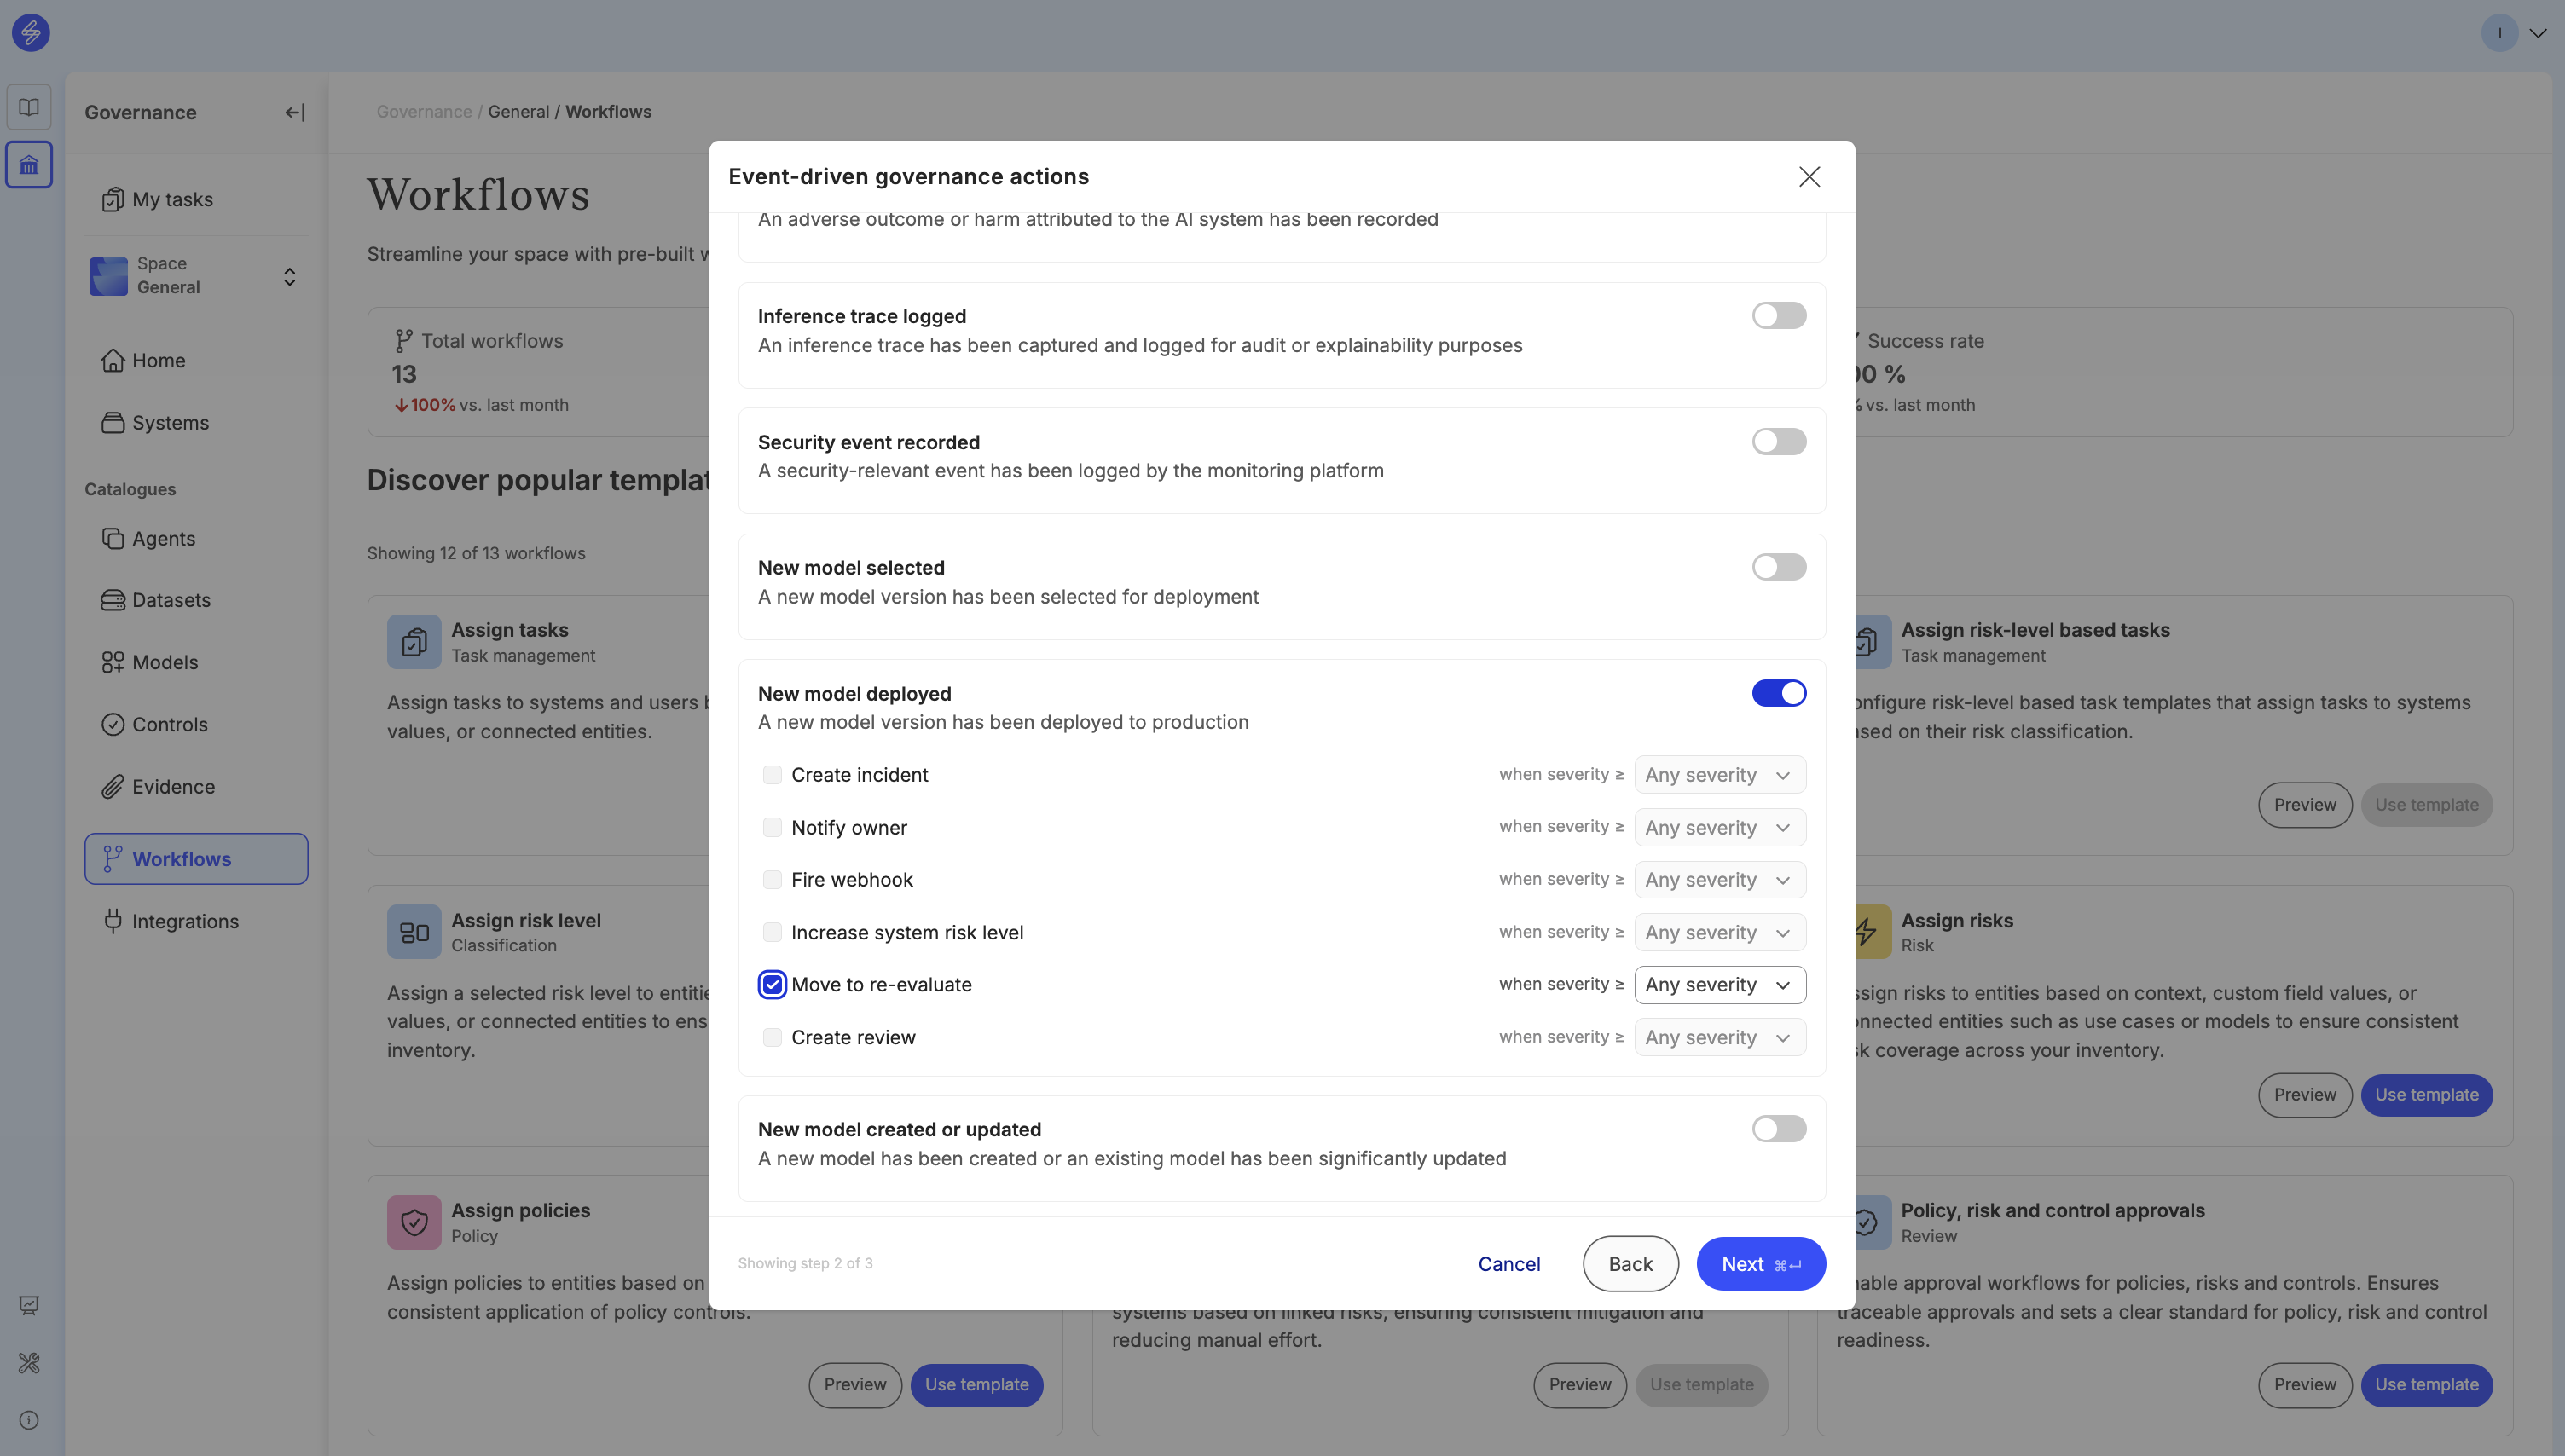
Governance is not linear. A new model version, data source, use case or requirement can send a system to Re-evaluation, either by a person or automatically through the Event-driven governance actions workflow, as long as the stage is not gated. As a system is built from components that are governed on their own, re-evaluation should focus on the system’s risks and controls directly affected by the change.
How it works end to end
-
Configure lifecycle stage and risk-level based tasks (Admins and Space managers): choose which tasks systems receive at each risk level and phase.
-
Configure lifecycle stage gates (Admins and Space managers): for each stage, set the requirements to enter it and how a system enters. Lifecycle stage gates are applicable to systems only.
-
Update the System specific lifecycle stage: it starts in Initiation and receives the task set for its risk level.
-
Complete the stage specific tasks (system team): complete tasks and get the required policies approved.
-
Check readiness to move to next lifecycle stage: the Lifecycle widget shows what's still blocking the next stage.
-
Approve moving the system to next lifecycle stage: the move is approved by the gate, by a reviewer, or happens automatically, depending on the stage's settings.
-
Keep the trail: every move is recorded in Lifecycle history with a snapshot of the requirements at the time.
Part 1. Configure the lifecycle management
Lifecycle configuration is done per Space in Workflows, so different Spaces can have their own process. Space managers and Admins can configure these workflows.
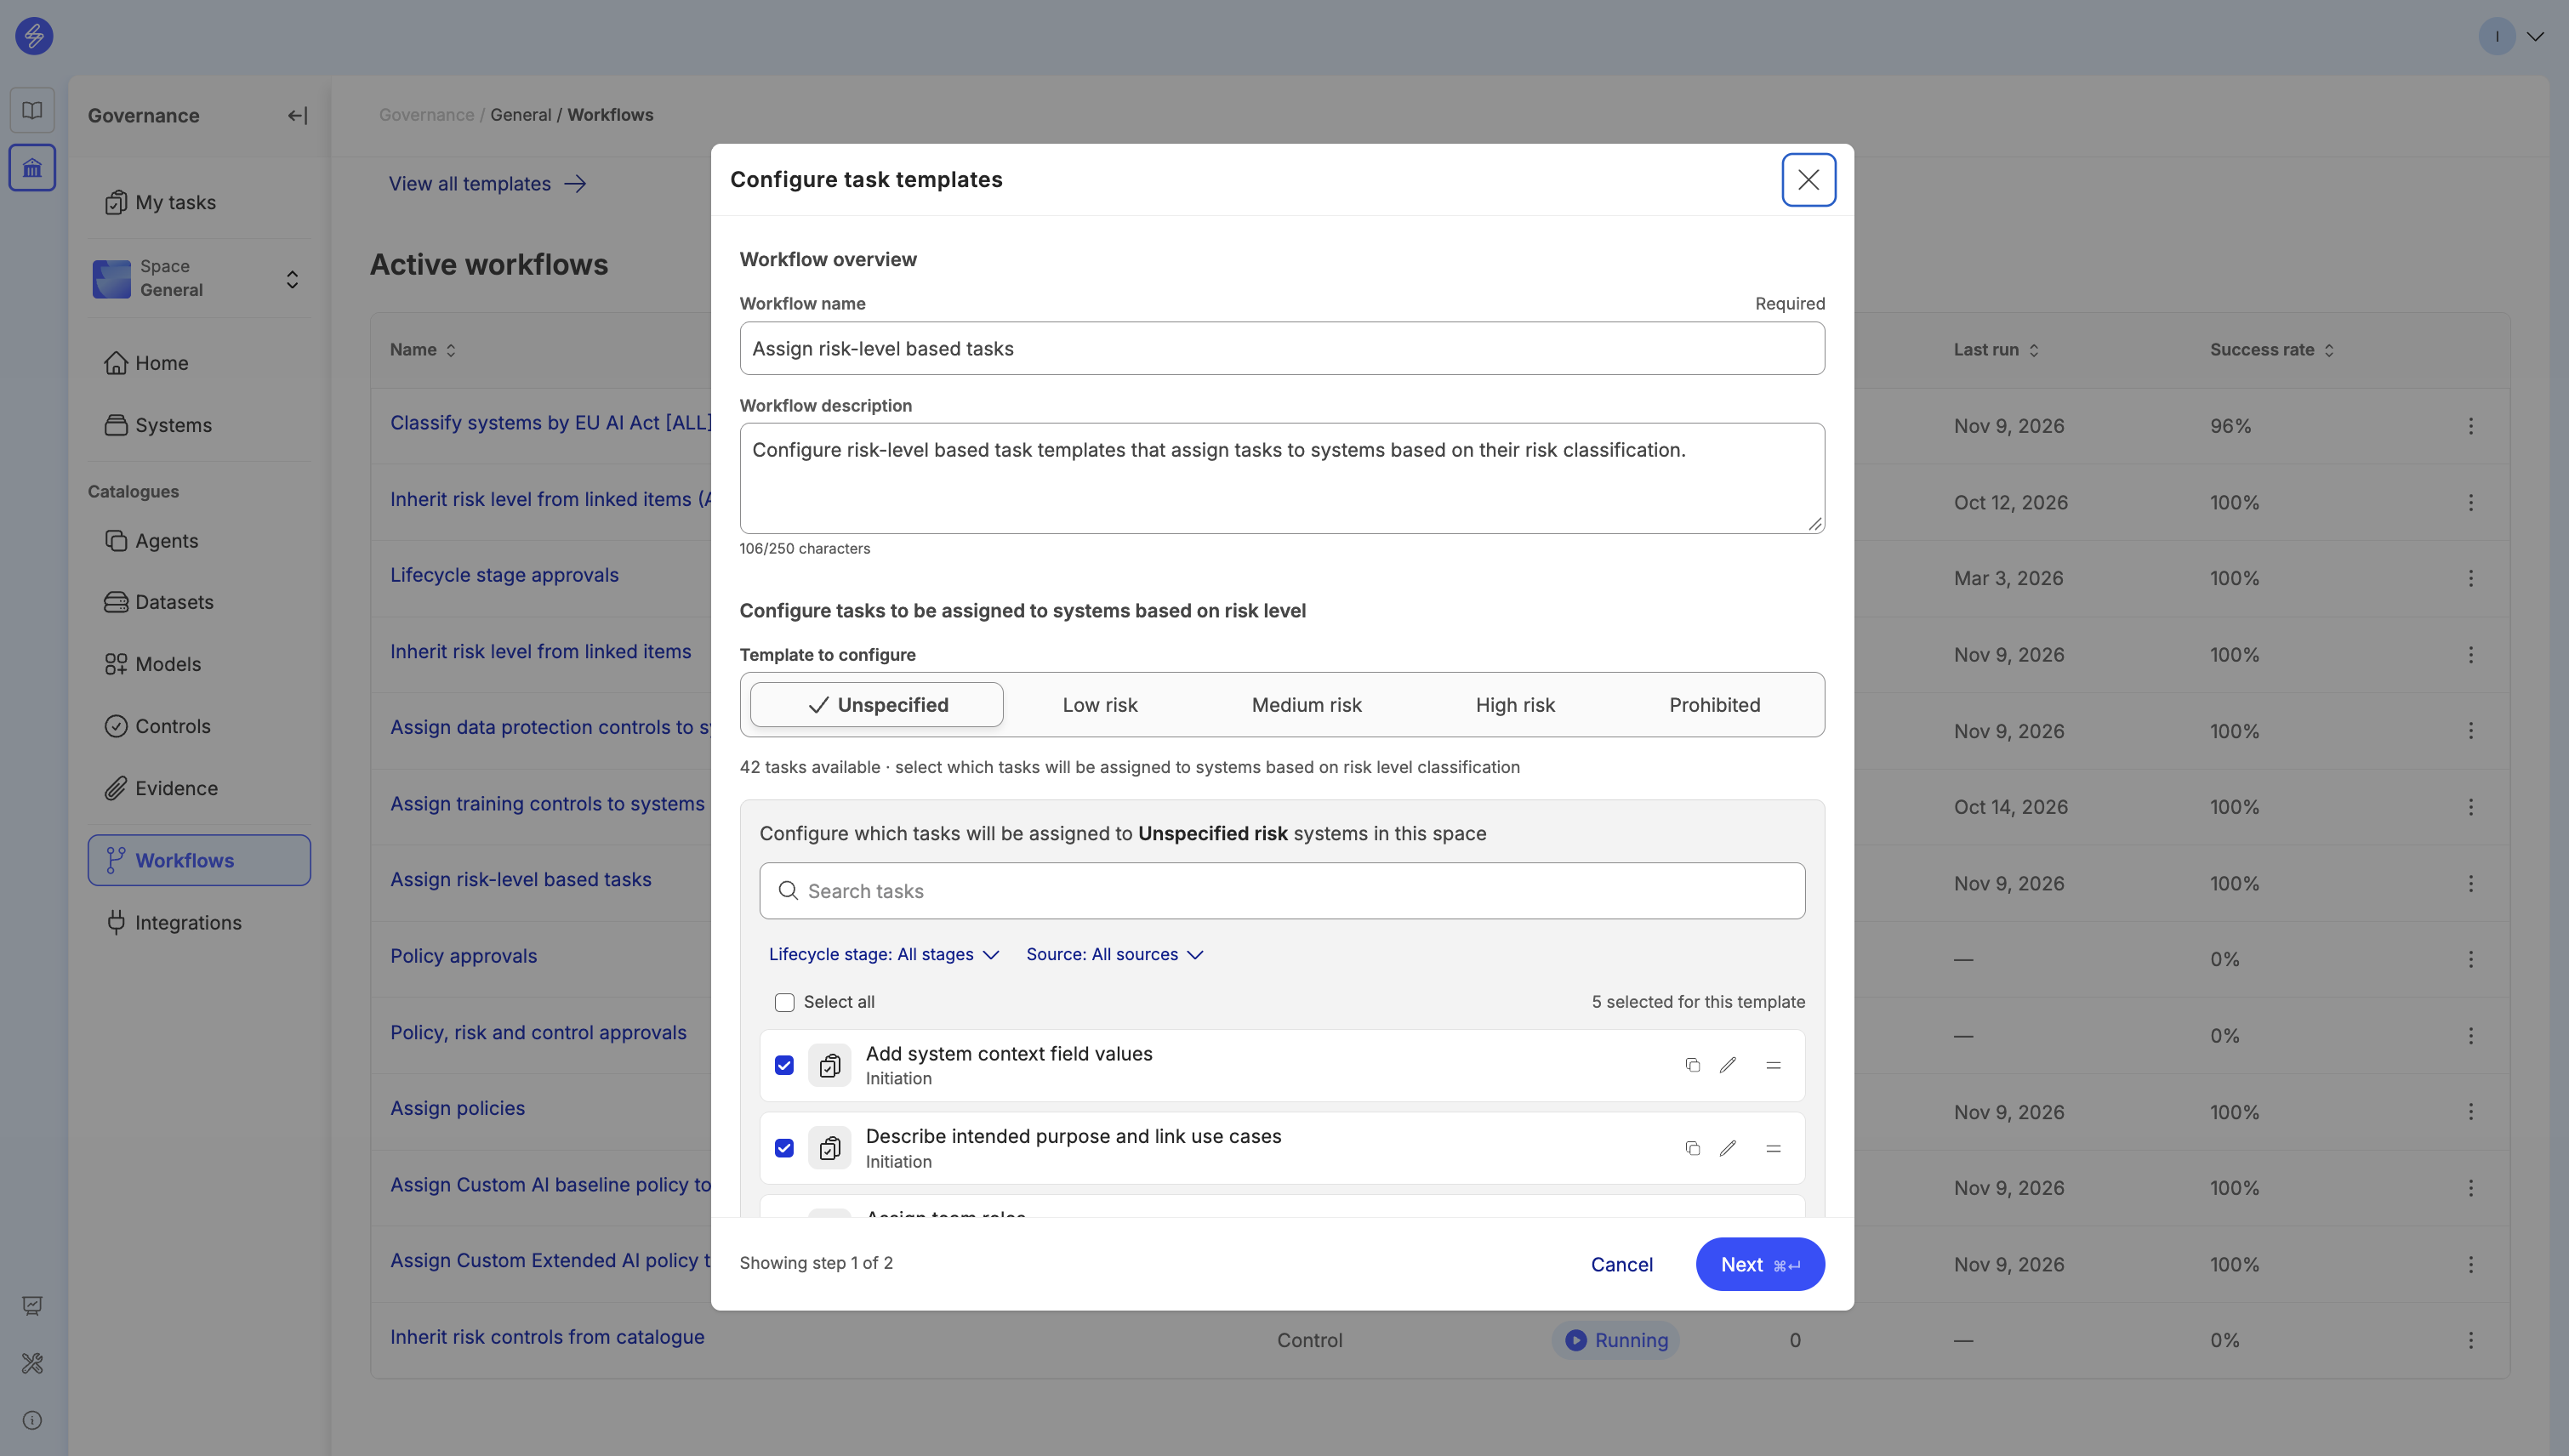
Step 1. Set up lifecycle phase specific tasks per risk level
Go to Workflows and select Use template on Assign risk-level based tasks. Pick a risk level, select the tasks systems at that level should receive and the stage each belongs to, then repeat for each level. By default:
|
Risk level |
Default tasks |
|---|---|
|
Unspecified |
5 tasks: Initiation stage tasks only, until the risk level is set |
|
Low |
6 tasks: Initiation stage tasks, plus a task to move to the Design and development stage |
|
Medium |
32 tasks across the full lifecycle |
|
High |
The same 32 tasks: add stricter tasks as needed |
|
Prohibited |
5 tasks: Initiation stage tasks only, to document the decision |
When you activate the workflow, each system gets its task set. Tasks are displayed stage by stage, highlighting the system’s current stage. Default tasks include tasks at each stage to move to the next stage. To add tasks for specific groups of systems regardless of risk level, use the Assign tasks workflow. See Manage tasks.
Step 2. Set up lifecycle stage gates
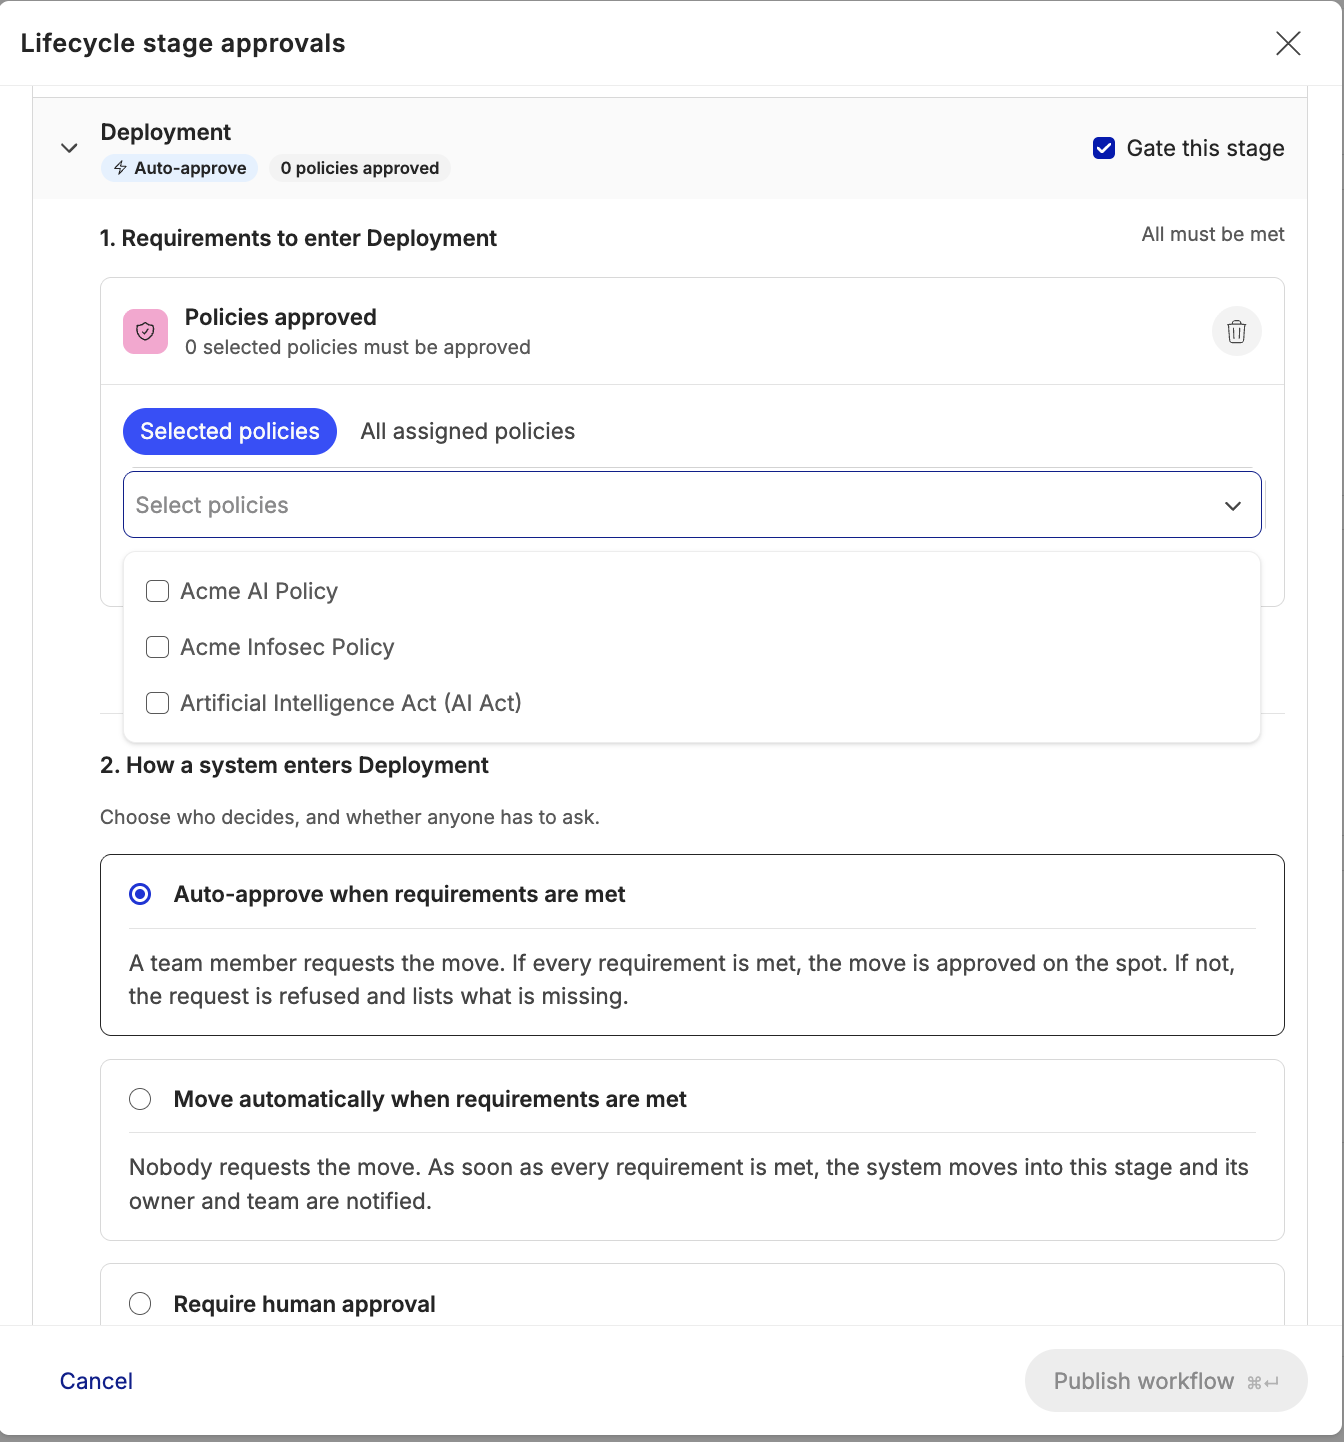
Go to Workflows and select Use template on Lifecycle stage approvals. Give the workflow a name and description, then open each stage under Configure lifecycle stages. Stages without a gate apply moves immediately. Select Gate this stage to configure it.
-
Requirements to enter the stage
Select Add requirement and choose one or both of the options below. All requirements must be met to move the system to the next stage or request approval.
-
Policies approved — choose All policies assigned to the system, or Selected policies from the Space's active library and custom policies. A selected policy that isn't assigned to a system or a selected policy that is then deactivated in the space counts as unmet: change your gate or ensure the policy is assigned to meet the gate’s requirements.
-
Tasks completed — tasks planned for all earlier stages must be done.
-
How a system enters the stage. Choose one of three entry modes:
|
Entry mode |
Who acts |
What happens |
|---|---|---|
|
Auto-approve when requirements are met |
A team member requests the move; the gate decides |
If every requirement is met, the move is approved on the spot. If not, the request is refused with the list of what's missing. |
|
Require human approval |
A team member requests; a stage reviewer decides |
The reviewer approves or rejects and sees the requirement checklist with the request. Optionally, requirements must be met before the request reaches the reviewer. |
|
Auto-progress when requirements are met |
No request needed |
A system in the previous stage moves by itself as soon as the last requirement is met. Optionally notify the system owner and members. |
For Require human approval, set the Approvers: by team role (for example Reviewer) or by specific members. The approver cannot be the same person as the requester.
Auto-approve and auto-progress need at least one requirement; otherwise every move would pass without any check. Note that in those cases, while there is no human oversight on stage moves, policy approvals must still be real reviews: the Policy, risk and control approvals workflow must be running and cover policies. If the workflow is not running, a fallback reviewer is chosen when setting up the Lifecycle stage approvals workflow and those gates will be marked as Review fallback on the Lifecycle widget.
-
Select Publish workflow to activate the gates.
If a gate is changed or added after initial setup, the updated/new gate will only apply to future moves.
Step 3. Connect the lifecycle to your other tools (optional)
Stage changes can drive actions outside Saidot. The Lifecycle stage changed event can fire a webhook, so a CI/CD pipeline can hold a release until Deployment is approved, or a model registry can promote a version only after validation. See Event-driven governance patterns.
Part 2. Manage the lifecycle of a system
Step 1. Follow the stage in the Lifecycle widget
The Lifecycle widget on the system overview shows the stages the system has passed, with their dates, the current stage and target dates for the stages ahead. Gated stages show their entry mode, such as Auto-approve or Human approval, so the team can see from Initiation onwards what each stage will require.
Step 2. Complete the stage work
Open tasks for the current stage appear on the system's Tasks tab and in each owner's My tasks. If task completion is set as a requirement, all tasks for all stages before the gate must be completed to move on to on to the next stage or request approval. Policies that a gate requires must be submitted for review and approved; see How to manage AI policies and compliance.
Step 3. Check readiness for the next stage
Use Check requirements for in the widget to see what a stage needs. It defaults to the next stage, but you can look further ahead: the list includes every gated stage the move would cross.
For each stage, open items are listed under Blocking with their status so users can know what needs to be done. Met requirements are listed under Met. The same checklist appears on the Reviews tab, where a banner tells you when the system is ready to move or what is blocking it.
Step 4. Move the system
The button under the checklist depends on the next stage's entry mode:
-
No gate — select Move to [stage]; the move applies immediately.
-
Auto-approve — select Move to [stage] once all requirements are met. The gate approves the move on the spot.
-
Human approval — select Request move to [stage]. The stage reviewer gets the request with the checklist and approves or rejects it. Until then, the stage shows Pending approval.
-
Auto-progress — nothing to select. The system moves as soon as the last requirement is met, and the team is notified.
Note that if the Policy, risk and control approvals workflow is not running the Auto-approval and Auto-progress gates will show Review fallback and the fallback reviewer will need to approve the policies.
Skip to a future stage when you want to complete several stages at once: choose the target stage and check the requirements of every gated stage this move would cross. All requirements of all gates skipped need to be met for the skip to be allowed.
Gated moves are enforced regardless of platform use method: API and MCP users, as well as monitoring events triggering stage changes, will also need to meet requirements before moving to next stages.
Step 5. Review the lifecycle history
Select View lifecycle to open Lifecycle history. Each move shows who requested it, who approved it (a reviewer, or the stage gate for automatic moves) and when. For gated moves, the gate snapshot records the state of every requirement at the moment of decision, with its reason, approver and expiry. Snapshots can be exported for auditors, and all moves and decisions are also kept in the audit log.
Good practice
-
Gate the stages where a decision really matters, typically Deployment and Retirement, and keep early stages ungated so teams can start quickly.
-
Use auto-approve where requirements fully capture the decision, and human approval where judgement is needed.
-
Agree gate requirements with your second line, and make the deployment approval visible to the platforms that release AI, so a pending or rejected stage keeps the release on hold.